Thursday, April 18, 2019

Pega CLSA Guide Book 1 - Choose a More Reliable VM Networking


During my application build, my network was disconnected a few times, for no reason at all. In fact, I had NEVER encountered such issue before, and the application build was my first encounter! (Murphy’s law)

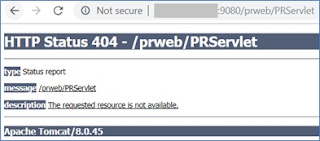
At that time, I didn’t want to make any changes to my VM, including the network, so I had waited, logout, login and also restarted the VM. The issue continued, and I persisted, but in the end, Tomcat was corrupted, and I couldn’t even access the Designer Studio. This was the error screen:
VM Crashed During Pega CLSA App Build - How to Prevent
Figure 42: Unable to Access Designer Studio, Tomcat Error

Wasn’t that horrific? My application build VM could no longer be accessed! Which meant that I could no longer continue my application build!!!

 Till today, I still did not have any idea what went wrong.

I didn't use host-only adapter initially as I was not sure if there would be a need to connect to the Internet from the VM.

In the end, I had to change the VM network to Host-Only adapter and continue my exams after restoring my snapshot.

That leads us to the next point (i.e. next chapter)

Monday, April 15, 2019

Pega CLSA Guide Book 1 - Performing Re-Indexing of Search Index


In general, this should be a simple task, You can access this using: Designer Studio > System > Settings > Search, as shown below:

Figure 34: Accessing Pega Search Index

As you would again realise, the steps provided in the CLSA document is not updated.

Anyway, after clicking the menu item, you would see the following:
Figure 35: Pega Search Index Screen

There is really no magic here, basically, just scroll down and take note of the following:
Figure 36: Search Index Agent Information and Search Index Host Node Setting

For the “Agent information” section, take note that the Queue size MUST be zero, if it is not, then very likely, you are having some agent issue. Ask the Pega Community for help or contact CLSA Team. The other important section is “Search index host node setting”. You need to ensure that the “Node Status” is “online”, as shown above. If it is not, again, shout for help!

Scroll back to the top, and under the “Index administration” section, ensure the indexes are enabled. 
Figure 37: Index Administration with Core Indexes Enabled

By default, the “All work” is not ticked. This does not really matter.

Click the Check button one-by-one, make sure you have a message indication that all are well as shown below:
Figure 38: Diagnostic Messages of the Search Indexes

If you are curious, you can always try to click the “Re-index” button, and you should see this:
Figure 39:Re-Indexing Dialog Box

Just go ahead and select “All Classes”.
 
Figure 40: Re-Indexing Confirmation Window

Observe the index, it should be progressing as shown below:
Figure 41: Re-Indexing in Progress

Once everything is done, you will be back to the screen, showing the completed index sizes.

Of course, Murphy’s Law applies, if it is not broken, don’t fix it, unless you have a lot of time to play around with it.


[Check the book availability here]